|
|
Sony have been listening and as a result of customer feedback they developed the new PMW-200 handheld camcorder. Designed to meet the needs of broadcast productions the camera records on to solid state media using 50 Mbit/s 4:2:2 XDCAM HD. This is the exact same codec as used in the highly regarded PDW-700, F800 and PMW-500 shoulder mount broadcast camcorders.
 [list=none]Hot search: MOV to Premiere|XAVC to Premiere|AVCHD to PremiereI had a friend do me a favor, let me borrow his Sony PMW-200- a great looking camera – for a shoot. While my workflow with Sony Vegas works perfectly with these files, but my Premiere don’t always have the codec for .mxf files. Well I would like to say Adobe Premier Pro imports and edits XDCAM formats in the native recording codec. So to edit Sony PMW-200 XDCAM media in Adobe Premiere smoothly, the easy workaround is to transcode Sony XDCAM MXF to MPEG-2 or MOV or WMV format which is friendly with Premiere. Here listed a step-to-step guide. [list=none]Hot search: MOV to Premiere|XAVC to Premiere|AVCHD to PremiereI had a friend do me a favor, let me borrow his Sony PMW-200- a great looking camera – for a shoot. While my workflow with Sony Vegas works perfectly with these files, but my Premiere don’t always have the codec for .mxf files. Well I would like to say Adobe Premier Pro imports and edits XDCAM formats in the native recording codec. So to edit Sony PMW-200 XDCAM media in Adobe Premiere smoothly, the easy workaround is to transcode Sony XDCAM MXF to MPEG-2 or MOV or WMV format which is friendly with Premiere. Here listed a step-to-step guide.
First of all, free download Pavtube MXF Converter for Mac. This Mac Sony XDCAM MXF converter can easily convert Sony PMW-200 XDCAM MXF files without quality loss. It can generates best editing format/codec for filmmakers and video enthusiasts to use in different NLE apps, such as Adobe Premiere Pro, Adobe After Effects, iMovie, Final Cut Express, Final Cut Pro 6/7/X, and more. If you are on Window PC, please get the Pavtube MXF Converter. Just download it and follow the workflow using Adobe Premiere Pro with Sony PMW-200 XDCAM on Windows or Mac.
How to convert Sony PMW-200 XDCAM MXF to Adobe Premiere Pro editable format?
Step 1: Connect your Sony PMW-200 XDCAM HD422 camcorder to Mac and keep it on, or use a card reader to transfer your footage to Mac. Get this Sony MXF to Adobe Converter installed, click top left two icons to load individual videos or the entire folder correspondingly.
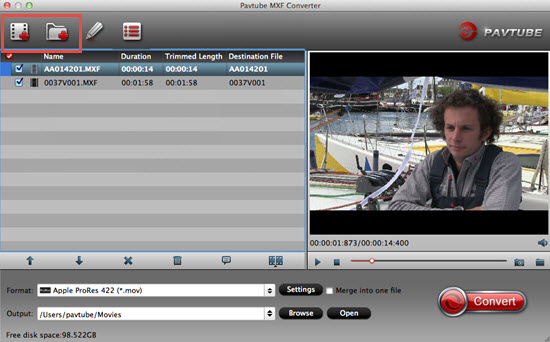
Step 2: Choose best format for editing in Adobe Premiere Pro CS5. Click the drop-down list besides “Format”, choose “Adobe Premiere > MOV(AVC) (*.mov)” as the most compatible format as well as best video quality for CS5. You can also choose “MPEG-2 (*.mpg)”, “WMV (VC-1) (*.wmv)”.

Step 3: Adjust output video settings including video size, codec, bitrate, frame rate by clicking “Settings”, all according to your needs.
Step 4: Click the big “Convert” button to start conversion. Wait for a while, you can get the fresh hot converted video which is compatible with Adobe Premiere Pro.
Tips:
Click here to learn: How to import Media Files to Premiere Pro on Mac.
[size="3"]Related Articles:
Source:http://camcordervideoshare.altervista.org/blog/use-sony-pmw-200-xdcam-with-premiere/?doing_wp_cron=1480418534.3760170936584472656250
|
|


 Zombie Point

 โพสต์ 1-12-2016 13:41:36

 บุ๊คมาร์ก
 สนับสนุน
 คัดค้าน